2025. 1. 7. 15:04ㆍ쿠버네티스/Kubernetes for the Absolute Beginners
Replication Controller
2.1 개념
Replication Controller는 애플리케이션의 고가용성을 보장하기 위해 여러 개의 Pod 인스턴스를 실행합니다.
- Pod가 하나만 실행 중일 경우, 해당 Pod가 실패하면 애플리케이션에 접근할 수 없게 됩니다.
- 이를 방지하기 위해 여러 Pod를 실행하여 하나가 실패하더라도 다른 Pod가 애플리케이션을 계속 제공할 수 있도록 합니다.
2.2 주요 기능
- Pod 복제: 지정된 개수의 Pod를 항상 실행 상태로 유지.
- 자동 복구: Pod가 실패하면 새로운 Pod 생성.
- 로드 분산: 여러 Pod를 통해 사용자 요청 부하를 분산.
- 확장성: 클러스터의 여러 노드에 Pod를 배치하여 애플리케이션 확장.

2.3 YAML 정의 파일
Replication Controller 정의 파일은 다음과 같은 4가지 최상위 필드를 포함합니다:
- apiVersion: API 버전 (예: v1).
- kind: 객체 유형 (예: ReplicationController).
- metadata: 이름 및 라벨 정보.
- spec: 사양 정의.
Pod 템플릿을 포함하여 YAML 파일은 다음과 같이 작성
apiVersion: v1
kind: ReplicationController
metadata:
  name: my-app-rc
  labels:
    app: my-app
spec:
  replicas: 3
  selector:
    app: my-app ## template 밑의 metadata labels의 값과 동일해야함
  template:
    ### 여기서부터는 pod의 yaml 내용과 동일
    ##아래 apiVersion, kind 속성만 빠졌다고 생각하면 됨.
    ### apiVersion: v1
    ### kind: Pod
    metadata:
      labels:
        app: my-app ## selector의 값과 동일해야 함
    spec:
      containers:
      - name: nginx-container
        image: nginx
ReplicationController에서 selector를 명시하지 않으면 기본적으로 Pod 템플릿(.spec.template.metadata.labels)에 정의된 라벨이 selector로 설정
apiVersion: v1
kind: ReplicationController
metadata:
  name: my-app-rc
spec:
  replicas: 3
  template:
    metadata:
      labels:
        app: my-app
    spec:
      containers:
      - name: nginx-container
image: nginx- .spec.template.metadata.labels에 정의된 app: my-app 라벨을 기본 selector로 설정
- 따라서, app: my-app 라벨을 가진 Pod만 관리 대상
주요 명령어
- 생성: kubectl create -f rc-definition.yml
- Replication Controller 확인: kubectl get replicationcontroller
- 생성된 Pod 확인: kubectl get pods
Replica Set
Replica Set은 Replication Controller의 개선된 버전으로, 동일한 목적을 가집니다. 그러나 몇 가지 차이점이 있습니다.
3.1 주요 차이점
- API 버전:
- Replication Controller: v1
- Replica Set: apps/v1
- Selector 필드:
- Replica Set은 반드시 selector 필드 정의가 필요합니다.
- Selector는 관리 대상 Pod를 식별하며, 기존에 생성된 Pod도 관리할 수 있습니다.
3.2 YAML 정의 파일
Replica Set 정의 파일
apiVersion: apps/v1
kind: ReplicaSet
metadata:
  name: my-app-rs
  labels:
    app: my-app
spec:
  replicas: 3
  selector:
    matchLabels:
      app: my-app
  template:
    metadata:
      labels:
        app: my-app
    spec:
      containers:
      - name: nginx-container
        image: nginx
주요 명령어
- 생성: kubectl create -f rs-definition.yml
- Replica Set 확인: kubectl get replicaset
- 생성된 Pod 확인: kubectl get pods
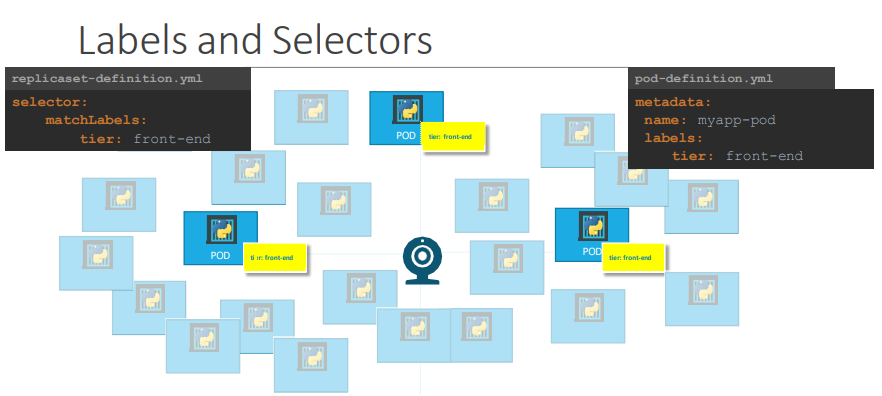
레이블과 셀렉터
레이블(Label)
Pod와 같은 객체에 키-값 쌍으로 메타데이터를 추가하여 식별 및 그룹화에 사용됩니다.
셀렉터(Selector)
레이블을 기반으로 관리 대상 객체(Pod)를 선택합니다.
- 예시:
selector:
  matchLabels:
    app: my-app
Replica Set 확장(Scaling)
Replica Set의 복제본 수를 변경하려면 다음 방법 중 하나를 사용합니다:
- YAML 파일 수정 후 업데이트:
- 명령어로 직접 확장:
kubectl replace -f rs-definition.yml
kubectl scale replicaset my-app-rs --replicas=6
Replication Controller와 Replica Set은 고가용성과 확장성을 제공하는 쿠버네티스 컨트롤러
- Replication Controller는 기존 기술이며, Replica Set이 이를 대체
- Replica Set은 더 유연한 Selector 기능을 제공
- YAML 정의 파일을 작성하고 명령어를 사용해 손쉽게 리소스를 생성, 관리, 확장

Demo - ReplicaSets
apiVersion: apps/v1
kind: ReplicaSet
metadata:
  name: myapp-replicaset
  labels:
    app: myapp
spec:
  selector:
    matchLabels:
      env: production ## pod labels에서 가져옴
  replicas: 3
  template:
    metadata:
      name: nginx-2
      labels:
        env: production ## 위 matchLabels와 일치
    spec:
      containers:
        - name: nginx
          image: nginx
kubectl create -f replicaset.yaml
kubectl get replicaset
kubectl get pods
kubectl delete -f replicaset
or
kubectl delete replicaset [replicaset name]
make a replicaset yaml
apiVersion: apps/v1
kind: ReplicaSet
metadata:
  name: frontend
  labels:
    app: mywebsite
    tier: frontend
spec:
  replicas: 4
  template:
    metadata:
      name: myapp-pod
      labels:
        app: myapp
    spec:
      containers:
        - name: nginx
          image: nginx
  selector:
    matchLabels:
app: myapp- ReplicaSet은 Kubernetes 1.9 버전에서 apps/v1로 이동
How many ReplicaSets exist on the system?
- kubectl get replicaset
What is the image used to create the pods in the new-replica-set
- kubectl describe replicaset new-replica-set
# kubectl describe replicasets.apps new-replica-set
Name:         new-replica-set
Namespace:    default
Selector:     name=busybox-pod
Labels:       <none>
Annotations:  <none>
Replicas:     4 current / 4 desired
Pods Status:  0 Running / 4 Waiting / 0 Succeeded / 0 Failed
Pod Template:
  Labels:  name=busybox-pod
  Containers:
   busybox-container:
    Image:      busybox777
    Port:       <none>
    Host Port:  <none>
    Command:
      sh
      -c
      echo Hello Kubernetes! && sleep 3600
    Environment:   <none>
    Mounts:        <none>
  Volumes:         <none>
  Node-Selectors:  <none>
  Tolerations:     <none>
Events:
  Type    Reason            Age   From                   Message
  ----    ------            ----  ----                   -------
  Normal  SuccessfulCreate  60s   replicaset-controller  Created pod: new-replica-set-shnjx
  Normal  SuccessfulCreate  60s   replicaset-controller  Created pod: new-replica-set-cw7zn
  Normal  SuccessfulCreate  60s   replicaset-controller  Created pod: new-replica-set-bk75v
  Normal  SuccessfulCreate  60s   replicaset-controller  Created pod: new-replica-set-wg54m
Why are there still 4 PODs, even after you deleted one?
- ReplicaSet ensures that desired number of PODs always run
Scale the ReplicaSet to 5 PODs.
Use kubectl scale command or edit the replicaset using kubectl edit replicaset
- kubectl scale --replicas=5 replicaset new-replica-set
Scale the ReplicaSet to 5 PODs.
Use kubectl scale command or edit the replicaset using kubectl edit replicaset
- kubectl scale --replicas=2 replicaset new-replica-set
'쿠버네티스 > Kubernetes for the Absolute Beginners' 카테고리의 다른 글
| Microsevices Architectue (0) | 2025.01.07 |
|---|---|
| Services (0) | 2025.01.07 |
| Deployments (0) | 2025.01.07 |
| PODs with YAML (0) | 2025.01.07 |